Showing posts with label steampunk. Show all posts

Saturday, 10 June 2017

Some Steampunk, Circles and Cactus flower...

Hi everyone

Hope you have lots of fun things planned for the weekend. It's nice and sunny here today after a week of high winds and rain - but at least it gave me more time to play :)

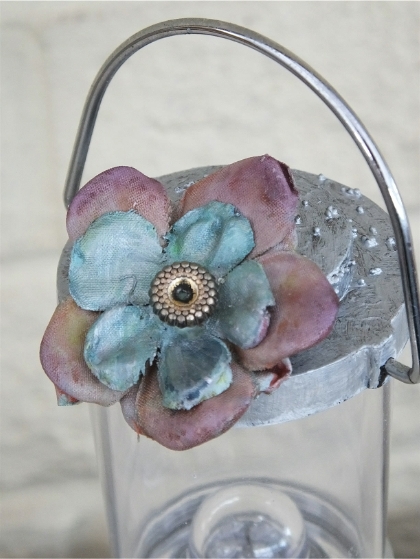
Previously I promised to show what I was doing with shrink plastic - so here are my earrings created with die cut shrink plastic and I'm linking to the fab Steampunk/mechanical theme at TIOT


I don't really like my photos - the light wasn't particularly good and its not really showing the textures very well or the difference between the matt and metallic paint/wax - I think it looks a bit better in real life.
Doing the little rings and fixing to the earring hook was a bit fiddly but I hope to make a necklace at some point to go with the earrings.


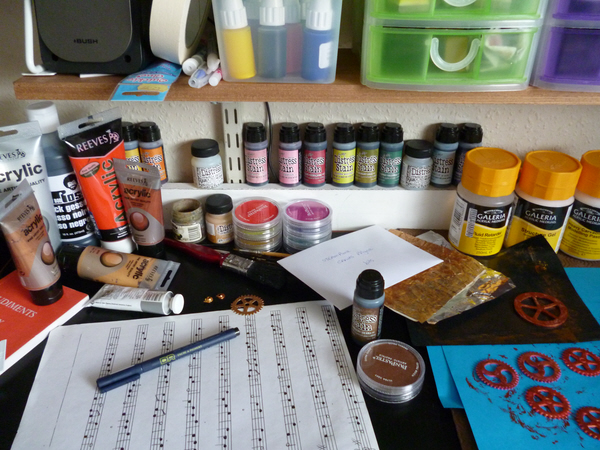
My die cut pieces shrunk and gessoed
The Airship balloon die by Sheena Douglass and cog dies from Crafters Companion. The small middle rivet looking bits were the circles left from the middle of the cog and when I heated them I stopped just before they uncurled so they left a folded over rim around the edge (hope that made sense).
 

 And for AJJ and Rosies circle theme I have an all digital piece all digitally made or photographed etc by me (the  palette isn't real but the paint brush belongs to Dave)

  
If you saw yesterdays post you will know I was wondering when the Cactus was going to bloom. It always seem to happen around midnight but I couldn't keep awake and went to bed about 10pm and threatened nicely asked the Cactus not to bloom last night - ok you know what happened then and this is what we found this morning.

 
I'm hoping this is the first of many and not the only flower. I think the most it has ever had has been 4 or 5 flowers and it hasn't bloomed every year.
We bought this cactus probably about 1981-ish from the garden centre near us but we were living about 60 miles away then and it never bloomed until after 1996 when we moved here  - which was where it came from of course, so perhaps it had not bloomed before because it was home sick.
 
  
Thank you for stopping by.
hope you have a wonderful day and weekend.
Gill x


Friday, 9 June 2017

Steampunk lantern

Hello

I'm linking to TIOT for the fab Steampunk/Mechanical theme  and hope this piece is acceptable.  Not clockwork but I thought the wind-up mechanism was the the nearest thing to being almost steampunk.
The black rubber looking surface of one of our wind up lantern torches went very tacky and horrible to touch like it was disintegrating. We weren't using it, so I had nothing to loose and gessoed over it - and when it dried it was a much nicer surface.
Then I  mod-podged some dictionary papers over that (the lower part of porch) and painted. Added some painted foam die cut cogs and hands.
The top was also black but I mixed up some glass bead medium with some paint for texture and painted that and added my painted silk flower. I didn't overdo the decoration as this still has to be usable and not have things get in the way when winding it up.
 
The photos aren't very good because the light has been bad with the rainy days we have had this week.


First play with some new stash including some more TH distress oxide ink pads and a set of stamps called 'Katrina' designed by the lovely Donna from Inky and Quirky Designs.
I needed to add to my cards supply so made a couple of quickish and simple cards.
The first card has some paper piecing, the cutting out is hard on my hands but I love the results.  Used the oxides on the background, coloured Katrina with Neocolor 2's. Unfortunately the photo isn't showing the iridescent glitter glue I added to the circles on her hair and skirt or on the hanging heart. The sentiments used are rub ons.
There are some lovely quirky fish in this set which is on my list to play with next :)


A big old Cactus is starting to flower again - hopefully it will have more than just the one flower which when it opens always seem to be around midnight and doesn't last more than a day or so. It was almost 15 years before it flowered for the first time.


 I mentioned using shrink plastic the other day but I will post that piece another day. 

 Thanks for stopping by
Gill x
 

Tuesday, 29 November 2016

Stripes for MM&M and some baubles for my Steampunk tree

 
Nearly didn't make it in time for MM&M Stripes challenge as had a bit of a hectic month.
So I've created an all digital piece using a kit called 'Words to live by' by Kimeric Kreations.
One of the cool tools in the software I use are 'digital scissors' -I used this to cut up the blue digital paper into stripes. 


At long last Dave made some of Valeries super spice bars after she so kindly shared the recipe with us back in august - and if you haven't already tried these, I can thoroughly recommend them as they are really yummy!

 
The first attempt, Dave made an error and somehow left the sugar out so that wasted a batch and then he had no chocolate left to drizzle on top for the second batch. Not sure how we ran out of chocolate, that was bad planning! ha ha,  but even so, they were really lovely and also very nice with custard. 
 Great recipe - thanks Valerie x

October was spent finishing all the Christmas cards and November spent making more ornaments for our Steampunk themed Christmas tree. I'm done making them for this year now so now I need to clear up all the mess that is all over my 3 tables and a lot of the floor too.


The hooks on the front of my shelves were great
for dangling things that needed to dry.


I had great fun making 5 of these using silver baubles, metallic paints, green eco paint and fun foam.


 I will show some other things I made for the tree another time.
 
thanks for stopping by
hope your day is a good one
Gill xx


Sunday, 18 October 2015

ARCHITECTURE the Art of using space

Hi... hope your weekend is going well.
Linking today another piece to Art Journal Journey challenge where the theme this month is 'architecture' and there's loads of amazing inspiration to see.


This digitally created piece is incorporating my own Steampunk lady artwork (soft pastels) I've used before and a photo of helter skelter on a local pier. Tried to make it look like the helter skelter was emerging from her hat. The soft coloured patterned background is digital too which I made a couple of years ago. The remainder is clipart/tubes type of thing. All digitally blended together.

Thank you so much for visiting today
Have a great day
Gill x

Thursday, 17 September 2015

Work In Progress

Hellooooo...... I've been playing with another drawing (although at time unfinished but needed a break from the pastel dust) so went and made a digital page with it.... (little voice inside is saying 'housework, housework' ....nahhh.. not now )
 
So I copied the image and using the usual software I use (Craft Artist) altered transparency on one layer and added some colour burn too.
Then added some more digital Steampunk elements which I designed some time back and then added some quotes/words art.


Ok so the sun is shining and I really am going to do some housework and gardening so will catch up with you later ..

Have a lovely day and thanks so much for stopping by

Gill x

Saturday, 30 May 2015

Steampunk Clock


MDF clock (from Indigo Blu) designed using Steampunk digi kits
 from Daisy Trail printed on to tissue paper.
Tissue paper requires a little patience as its quite
 fragile but worth it I think.
Painted clock with acrylic paints.


thanks for stopping by x

Monday, 30 March 2015

A scrap of scrapping


It's official, I am a Steampunk addict and I just love this photo of one of my husbands ancestors and thought this fabulous steampunk kit called 'A scrap of Steampunk' by Lynne Anzelc Designs was perfect to use with it.


Another page using a Lynne Anzelc kit - this time using 
'A scrap of Art' - next to Steampunk I love Arty/Grungy things and this has some lovely arty pieces in.


thanks for stopping by x

Wednesday, 11 September 2013

WOYWW #223

Hi everyone and welcome…

It's Wednesday - yippeee!... which means we go blog hopping around the world to see what you have on your desk, all thanks to the lovely Julia at THE STAMPING GROUND.

To join in the WOYWW fun aka 'Whats on your work-desk Wednesday' check out the info over at Julia’s place.

I've not WOYWWed for a few weeks - spent a lot of time trying to get my head around my new laptop with Windows 8 and re-installing programmes etc - say no more about that !

This is my desk this morning

Two projects on the go - some painted cogs drying - punched out on red fun foam (instead of having to paint an undercoat red first) this is just the first bit - lots more of paint and ink to add still to get the metallic effect I want.
Aiming to recreate my digital avatar I made of the steampunk owl.

Secondly I made a sheet of music yesterday which still needs to be aged/distressed. But first I took a photo of it and made it into a quick digi-paper design just to show one of the things I am going to use it for.


Also this is the first opportunity to show my lovely ATCs and things from SaraJ over in Alaska - from the ATC 4th anniversary swap - I love them Sara thank you x


Thanks so much for stopping by and leaving your comments
have a lovely day x

Sunday, 23 June 2013

Out of a Hat Creations #65 Transport challenge

This is for a fabulous challenge over at Out of a Hat Creations about Transport - I needed to make some male cards, so this was a great excuse to play with this theme.


On a white tent style card used spiced marmalade and walnut stain distress stains and green intense pencil around edge.  Then layered a smaller piece of blue card.


Stamped onto to some patterned paper off-cuts I found.
Used Indigoblu 'Grand Tour 1' stamps coloured with Inktense pencils.


I printed and cut out some Dieselpunk cars (like the one on my blog heading) that I had designed and made myself digitally using Serif Craft Artist software.


Added some faux stitching with  black pilot pen.


Car is just a simple decoupage - only two layers.
Used Quickie glue pen and silver foil to highlight tyres and various parts of car and also on stamped image of car and girl on bike.
Cog die cuts on silver card are made by X-cut.

Thanks for stopping by and looking - Gill x

Sunday, 3 March 2013

Cuckoo clocks go Steampunk

Challenge #1


This is a piece I made for the fabulous new Steampunk challenges over at SanDee and Amelie's


   Steampunk (and Dieselpunk) is one of my favourite themes, so wishing them much success in their new adventure. I'm really looking forward to seeing what everyone creates.


Cut out main shape using X-cut 'rectangle parenthesis 2 nesting dies' on pale yellow card and also (not shown) a larger black piece to back it on. 
I used X-cut tri-boss Chronology clocks folder for body of the Cuckoo clock and main featured clock dial.
For the clock body I used a pale yellow textured card and painted a light wash of brown, blue and black Aquamarker pens that I rubbed over a piece of plastic and watered down. I then put the damp card with a piece of tissue over top in folder as this seemed to make an even better impression.


 I cut this out of the card ran through the embossing folder and then I used some chalks and metallic rub-ons over top of the embossed images using red, black and gold.


Cut out shape for part of the roof in pale yellow card and again used watercolour on top of that.


Used Papermania: Urban stamps - 'Bird print' over this and then put through paper ribbler. Also then cut out a larger piece of same shape on black card to back this on.


Cut a piece of K and Company paper from 'Lifes journey' for main background, put it through paper ribbler to give it the wavy texture. Highlighted certain parts using white souffle pen and red rub on wax and gold acrylic paint.


Added more rub on wax and gold acrylic paint and a little white souffle pen to highlight certain parts.


Cut out pendulums using some Spellbinders swirly dies. Stamped on them using music stamp from Urban bird print set, added some gold paint.

Used X-cut Chronology cogs dies and then added red rub on and gold paint. A few brads for centres.
Also stamped the bird from same set of stamps.

Using various mini alphabet stamps, stamped out quote.. then assembled the whole thing.


Tuesday, 5 February 2013

WOYWW #192


Hello and welcome again all you WOYWWers, hope you have had a lovely crafty week...
Wednesday can't come fast enough... ooh does that sound rather sad saying that - it's cause I'm well and truly hooked at looking at your workspaces already and this only my 4th WOYWW – thanks Julia.

Not sure what I’m waffling on about? WOYWW = Whats On Your Workspace Wednesday, where a lot of blog hopping and fun takes place -  
so take a peek at Julia's stamping ground blog for all the details and to join in the fun.

On my workspace today is the completed New Home card that was barely started last week. And the stamps I had out turned into a fairly OK Steampunk card after all..
Also on desk a few bits I have been experimenting with…


There are 2 papers made with embossing folder, aquamarker pens water and loo roll.

There’s a strip of black oven liner, cut off main piece on desk, to stick double sided tape on to add foil and add colour with permanent markers or alcohol ink - see border on Steampunk card below.
And I was playing with the 'plastic leftover thingy' that housed some Tim Holtz cogs/time pieces in. Into one of the circle segments I added some glitter and bits of sequin waste, then filled it with 'Klear' floor polish and finally laid circle of paper on top to be the backing. Then had to be patient waiting for it to dry. 
Just wanted to see how the ‘Klear’ dried and if the ‘thingy’ could be cut up to use on a card.
I didn't try the 'caught in crystal' technique with it yet as need to sort out everything I need to do it first. 
I think 'Klear' floor polish hasn't existed for a while but has been re-branded as 'Pledge Multi-surface wax' would love to know if anyone tried this technique with that.

  Also somewhere there is a screwed up bit of sequin waste which curled up like shrink plastic when heated up – and Yes Shoshi you were so right..good ventilation was required – opened the window but the wind was in wrong direction and blew the fumes right at me… cough..cough…gasp… 
 

NEW HOME CARD 


Card background was printed out using an Artylicious CD design by Glenda Waterworth.
Used a Martha Stewart border punch and some other various dies for leaves and swirls.
Coloured in stamping with promarkers.
Oasthouse stamp by Stampendous. Woman by Creative Stamps and message stamp by Kanban.

STEAMPUNK CARD


Used Inkadinkado and Andy Skinner stamps. Docraft cog dies on silver card and coloured with permanent markers as I was too lazy to get my inks etc out. The foil tape was using Kanban foil and markers.
Stamped the balloon onto some handmade paper I'd made some time ago.
 
 
PLAYING WITH EMBOSSING FOLDERS

 
Wanted to see what would happen if used aquamarkers on embossing folder, spritzed with water and laid folded loo roll on top, then spritzed again with some more water and then run through embossing machine.
 
 
Plenty of sequin waste left to choke on!
The jar on right is filled with plastic cake decorations, I cut off the nobbly bits that
go in the cake so they are then flat and easy to glue on a card.


More shelves - with old ice cream containers and the red stripy
long box was a cassette holder and now houses border dies etc

 
 Well I've waffled on long enough and you've places to go and things to do... so thanks for stopping by and for any comments left, which is much appreciated.
Happy crafting and have a good week.... Gill x